8 steps to create An Amazon A+ Content

By Tim
September 15, 2022

Sharing is caring!

What Is Amazon A+ Content?

Formerly known as Enhanced Brand Content (EBC), A+ Content is a unique tool within Seller Central that allows brand owners to customize by combining elements such as high-quality imagery, enhanced product descriptions, comparison charts, videos, and FAQs list.
So while Amazon listings are limited to eight images, 5-10 bullet points (depending on product category or business type), and a plain text product description of up to 2,000 characters, A+ content offers brand owners a more effective Ways to engage with potential customers.
The idea behind multimedia type content is to provide an outgoing shopping experience that attracts more traffic and increases conversions. The image below shows how A+ content enhances the visual impact of product descriptions.


8 steps to create An Amazon A+ Content

Step 1: Log in to your Seller Central account with appropriate credentials. (Note: Ensure you are brand registered before proceeding further)

Step 2: Go to Advertising and click on A+ Content Manager

Step 3: On the A+ content manager page, click on Start creating A+ content. Once you click on it, you will find a template that needs to be filled as a part of your A+ content.

  • Self-service modules
  • Amazon builds for you

Step 4: Choose anyone. If you click “Self-service modules,” it redirects you to a page where you will have to enter the ASIN that you want to create the content for. Then, you will see a list of options to build the modules and layouts.

Step 4: Once you choose the ASIN, you will be asked to choose a BUILD LAYOUT. Note that Amazon offers 12 types of modules, which are categorized into:

  • Standard (10 options)
  • Advanced (2 options)

Note: Of these 12 modules, a vendor can use up to 5 on his/her product page.

As a supplier, you can use the same module or mix modules as many times as you want. The cost of each package will vary, depending on the time of year. On the other hand, the cart price depends on the type of module the supplier chooses.

When done, select the Continue button. Upload images and content. Click the preview option to see how your page will look.

Click on the “add to cart” button to see the pricing details. Finally, buy your A+ content.

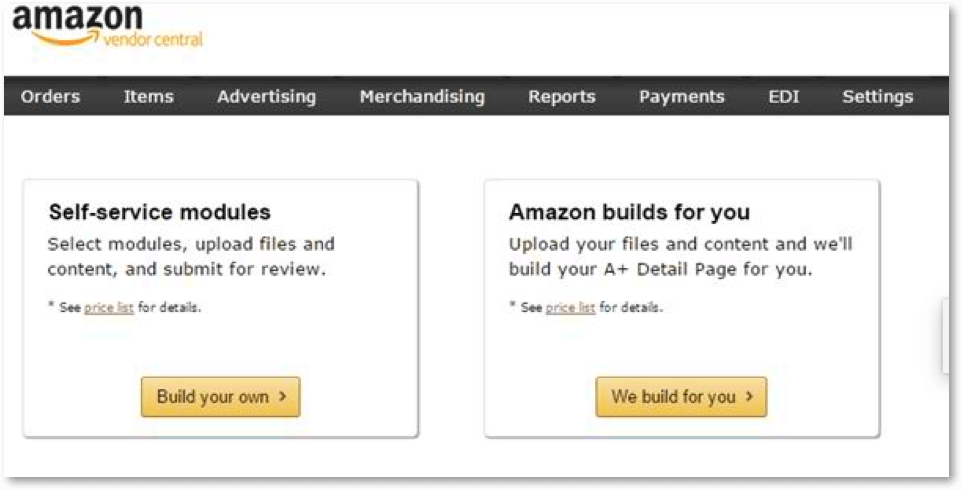
Step 5: If you choose “Amazon builds for you,” it redirects you to a page where you will have to just upload your text & images, and Amazon will do the rest of the job for you.

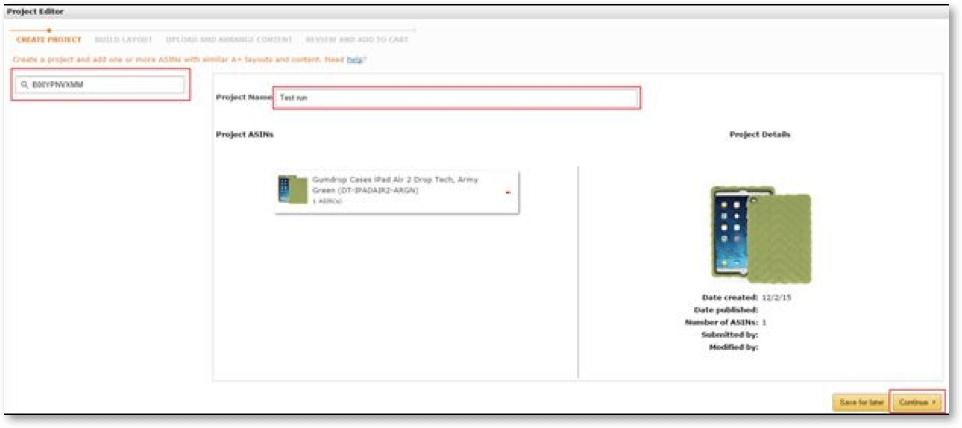
Step 6: Enter the project name. Make sure that it is descriptive and meaningful enough for you to understand as well as remember.

Step 7: Design the layout and upload your content (make sure to zip file for the images). Preview it so that you will know how it looks like before you publish it.

Step 8: If everything is good, click the finish button.

Once you fill in all the details correctly, Amazon will do a review and make your A+ page live in 7 business days.

But if you failed to stick to their guidelines or have done any mistake while creating the A+ content, it will lead to a “rejection.”


Leave a Comment