NEWS

amazon A+

10 Ways to Create Perfect Amazon A+ Content

By Joe
September 21, 2022

Sharing is caring!

Make Your Perfect Amazon A+ Content

The guidelines for working with A+ content are straightforward. Therefore, you should have no problem meeting the eligibility requirements. Having said that, getting one step ahead of the requirements and then optimizing your A+ content is where you will feel the pressure to stay on top of other Amazon sellers.
So, here’s what you need to do:


1. Emphasize your USP

Start by asking yourself a very simple question – what is the USP (only selling point) of my product?
Once you have the answer, put it on paper and ask yourself two more questions – what are the main benefits of using my product? How can my product help customers in their daily lives?
Remember that “benefits” and “features” are not the same thing. While “features” are important, “benefits” are things that drive emotions. When emotions are aroused, they drive purchases.

2. Be accurate and brief

Even a non-skimmer doesn’t want to struggle with reading tons of text to determine if your product is right for his or her needs. So stick to short and precise content that will quickly tell shoppers about the product and make the right buying decision.
Also, make sure to add A+ content to your best-selling products first. Use this feature where the chances of making a profit are higher.

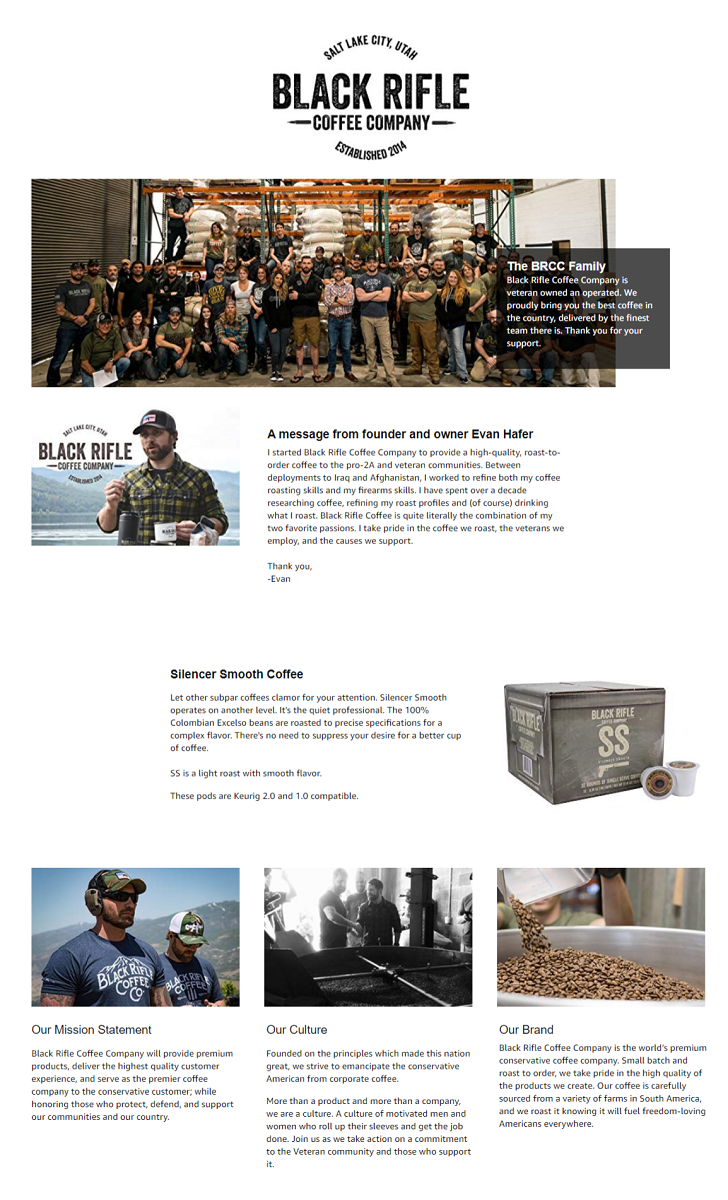
3. Combine pictures and text

Sure, high-quality images are useful in conversions, but you can actually do so much more by adding some interesting text that highlights the benefits or features of your product. This is a great way to add this, especially for viewers who are searching for specific information rather than snippets of your content.

4. Leverage Your Product Reviews

Reviews written by your customers are of high value and you should not underestimate them. Before creating A+ content, read your customer reviews, even those posted on competitor listings that offer products that are very similar to yours. Doing so will give you a clear picture of what type of content consumers want most.

5. Avoid Content Errors

Certain special characters and symbols, including copyright, registered trademarks, and registered brand symbols, are prohibited when creating A+ content. Also, you cannot include a hyperlink to any other website (however, you can include a link to any ASIN in the module type).

6. Pay attention to image size and resolution

To avoid being “rejected” by Amazon, please make sure that the images you upload are of the correct resolution and dimensions. Note that image requirements will vary depending on the module type you choose. So please read their requirements thoroughly.

7. Use banners wisely

Banners are one of the best ways to split up a product detail page. In fact, it presents buyers with a new segment, attracting buyers with high-definition images and providing more information about brands and products.
Using Adobe Express’s Banner Maker, you can create very high-quality banner images.

8. Proofread your content before submitting

As mentioned above, Amazon can take up to 7 days to approve your content. Often, however, they do it much faster than that. So make sure to proofread your content before submitting. For some reason, if your A+ page is published and you notice a grammatical error, you will submit the page again. Now, that means your mistake will last a week.

9. Make it more intuitive and less textual

A+ content should be more engaging, which means you should add lots of visuals and less text. Text should be simple and must communicate the message directly to the shopper. Also, maintaining the right balance between lifestyle product photos and real product photos is a feature that highlights ASINs.

10. Keep Your Design Uniform

Now, here are some important things for you to jot down. The biggest takeaway is that you don’t want to design for just one landing page. Instead, it applies to the entire product catalog, something you should never ignore.
You’re A+ content must be consistent throughout the layout. It should symbolize an extension of your brand as well as your website. Think of it as a big picture and the way you want to portray your brand as a whole.


8 steps to create An Amazon A+ Content

By Tim
September 15, 2022

Sharing is caring!

What Is Amazon A+ Content?

Formerly known as Enhanced Brand Content (EBC), A+ Content is a unique tool within Seller Central that allows brand owners to customize by combining elements such as high-quality imagery, enhanced product descriptions, comparison charts, videos, and FAQs list.
So while Amazon listings are limited to eight images, 5-10 bullet points (depending on product category or business type), and a plain text product description of up to 2,000 characters, A+ content offers brand owners a more effective Ways to engage with potential customers.
The idea behind multimedia type content is to provide an outgoing shopping experience that attracts more traffic and increases conversions. The image below shows how A+ content enhances the visual impact of product descriptions.


8 steps to create An Amazon A+ Content

Step 1: Log in to your Seller Central account with appropriate credentials. (Note: Ensure you are brand registered before proceeding further)

Step 2: Go to Advertising and click on A+ Content Manager

Step 3: On the A+ content manager page, click on Start creating A+ content. Once you click on it, you will find a template that needs to be filled as a part of your A+ content.

  • Self-service modules
  • Amazon builds for you

Step 4: Choose anyone. If you click “Self-service modules,” it redirects you to a page where you will have to enter the ASIN that you want to create the content for. Then, you will see a list of options to build the modules and layouts.

Step 4: Once you choose the ASIN, you will be asked to choose a BUILD LAYOUT. Note that Amazon offers 12 types of modules, which are categorized into:

  • Standard (10 options)
  • Advanced (2 options)

Note: Of these 12 modules, a vendor can use up to 5 on his/her product page.

As a supplier, you can use the same module or mix modules as many times as you want. The cost of each package will vary, depending on the time of year. On the other hand, the cart price depends on the type of module the supplier chooses.

When done, select the Continue button. Upload images and content. Click the preview option to see how your page will look.

Click on the “add to cart” button to see the pricing details. Finally, buy your A+ content.

Step 5: If you choose “Amazon builds for you,” it redirects you to a page where you will have to just upload your text & images, and Amazon will do the rest of the job for you.

Step 6: Enter the project name. Make sure that it is descriptive and meaningful enough for you to understand as well as remember.

Step 7: Design the layout and upload your content (make sure to zip file for the images). Preview it so that you will know how it looks like before you publish it.

Step 8: If everything is good, click the finish button.

Once you fill in all the details correctly, Amazon will do a review and make your A+ page live in 7 business days.

But if you failed to stick to their guidelines or have done any mistake while creating the A+ content, it will lead to a “rejection.”


how to register for customs declaration service

How to register for customs declaration service

By Steven
August 02, 2022

Sharing is caring!

How to register for customs declaration service

The UK will start to use the CDS (customs declaration service) system for declaration on October 1, 2022. The import declaration system CHIEF will be closed on September 30, 2022, and the export declaration service will be closed on March 31, 2023. Before this, the CHIEF system and CDS (customs declaration service) of the UK customs clearance system can be declared.

Get the CDS account registration on the UK government website and follow the process to register.

Notice: Before obtaining the CDS account, the seller friend must confirm that he has the Gateway ID of the British government. The Gateway ID is required when registering the British EORI number.


Why should I register for a CDS account?

  • It is convenient to query customs clearance information and download documents. Sellers can directly download the import VAT deferred records and C79 documents in the CDS account (if the import is deferred, there will be no C79 documents, because the deferred import VAT does not need to be paid)
  • If you do not register a CDS account, it may affect customs clearance or cannot be deferred.


What are the changes to the filing documents using the CDS system?

● CHIEF system declaration will have C88 and E2 documents (i.e. import tax documents, generally referred to as C88 documents), while CDS system only has CDS entry documents (i.e. CDS system tax documents)

● After the declaration, the seller can download the CDS system tax bill directly from the CDS account (the customs clearance agent can also provide the tax bill);

● The content of the CDS tax bill is divided into 8 categories of information instead of the previous 54 information boxes. The CDS system tax bill contains the following eight categories of information:

  1. Data (1/1,1/2…) represents declaration information
  2. References to documents, certificates, authorizations
  3. Identity information of importers and exporters, declarers, etc.
  4. Valuation method and tax calculation method
  5. The origin of the goods, the date and place of the declaration, etc.
  6. Product Details
  7. Shipping Information
  8. Other information

● The name of the Entry is changed to MRN, and the content is composed of 18 digits and letters. Sellers should pay attention to the “import entry” filled in in the Amazon backstage in the future, which needs to be changed from the Entry number to the MRN number.

CHIEF Entry

Newly added: “Seller”, “Buyer”, “Representative” declaration information on the tax bill of the CDS system, but the UK Customs has not yet mandated declaration

CDS New Information


How to pay taxes in CDS system

  • Recharge a certain amount in the cash account of the CDS account, and pay with the balance of the cash account;
  • Recharge a certain amount in the duty deferment account and settle the tax every month;
  • Real-time payment, payment through online bank transfer;
  • Jiufang E-commerce Logistics pays taxes on behalf of them;

For more information: Customs Declaration Service – GOV.UK


4 Steps to Send Products to Amazon FBA Warehouse

By Albert
July 27, 2022

Sharing is caring!

What is Fulfillment By Amazon FBA?

Fulfillment by Amazon (FBA) is a service that allows businesses to outsource order fulfillment to Amazon. Businesses send products to Amazon fulfillment centers and when a customer makes a purchase, we pick, pack, and ship the order. We can also provide customer service and process returns for those orders.


How to send products to amazon fba warehouse?

Step 1: Set up FBA

First and foremost, you’ll need to set up an Amazon Seller Account in order to begin shipping your product.


Step 2: Create product listings

  • Select Manage FBA Inventory from the Inventory tab of our Amazon Seller Dashboard.
  • Click the checkbox to the left of the product, then click Action On 1 Selected above the list.
  • Select Send/Replenish Inventory.
amazon product listing
  • If your product is already FBA listed, you can now just click on “Send Inventory”. If your product is merchant-fulfilled, you’ll first need to convert it to an FBA listing before you can continue – don’t worry, Amazon will prompt you to do this if necessary.
  • When you get to the next screen, make sure to check the “Create a new shipping plan” option as well as “Pack products,” which is when you’re sending multiple of the same product to Amazon.
  • Click “Continue To Shipping Plan”.
  • On the next screen you have the option to enter the number of items you will send to Amazon and the number of boxes, for example if you are sending 10 samples in a box you will need to enter the number 10 into the “Units Per Case” box and the number 1 Go to the Number Of Cases box.
  • Click “Continue”.


Step 3: Prepare products

Prepare products for safe and secure delivery to fulfillment centers according to Amazon’s packaging guidelines and shipping & routing requirements.

Step 4: Ship products to Amazon

Create a shipping plan, print Amazon shipment ID labels, and send shipments to Amazon fulfillment centers. Learn more about sending inventory to Amazon.

amazon shipping label


Notice for Shipping products to FBA

When first shipping to an Amazon FBA warehouse, you’re bound to make mistakes but, here we list the most common ones in order to help you avoid them:

  • Mislabeling – you must ensure that the product content matches the product label – failure to do so will result in the shipment being rejected.
  • No Labels – Amazon’s guidelines are pretty strict, and again, missing labels can result in the package being rejected and returned to you.
  • Unreadable barcodes – It’s important for Amazon FBA warehouse workers to be able to scan barcodes on packages quickly and easily – make sure the barcode is prominently displayed on the flat edge of the box, with no wrinkles.
  • Taking the time and attention to following the Amazon FBA shipping guidelines will ensure that your package is received and processed quickly—meaning you can start selling as quickly as possible.


How to find HS code - Online Seller

By John
July 19, 2022

Sharing is caring!

What is Harmonized System HS Code?

Harmonized System (HS) codes, accepted by most countries in the world, the HS code is an identification code for goods used in international trade. HS codes are administered by the World Customs Organization (WCO) and are used internationally by customs authorities and companies to identify goods.


HS code work for?

The customs code are used by customs authorities, statistical agencies, and other government regulatory bodies, to monitor and control the import and export of commodities through:

  • Customs tariffs
  • Collection of trade data (international trade statistics)
  • Rules of origin
  • Collection of internal taxes
  • Trade negotiations (e.g., the World Trade Organization schedules of tariff concessions)
  • Transport tariffs and statistics
  • Monitoring of controlled goods (e.g., wastes, narcotics, chemical weapons, ozone layer depleting substances, endangered species, wildlife trade)
  • Areas of Customs controls and procedures, including risk assessment, information technology and compliance.
  • Companies use HS codes to calculate the total landed cost of imported products and parts, and to identify selling and sourcing opportunities abroad.

Note:

If you don’t include the HS code on the commercial invoice and other shipping documents, you risk the receiver paying the wrong tax and could possibly delay the shipment.


Classification of HS code

It is organized logically by economic activity or component material. 

For example, animals and animal products are found in one section of the HS, while machinery and mechanical appliances are found in another. The HS is organized into 21 sections, which are subdivided into 99 chapters. The 99 HS chapters are further subdivided into 1,244 headings and 5224 subheadings.


One Step Find Your HS code

Enter the product name or product code to find the relevant detailed information, take the Banana as an example:

China HS Code:

Search Link: HS Search

US HTS Code

Search Link: HTS Search

US hs code

EU Taric Code

Search Link: Taxation and Customs Union 

EU hs code

Canada Tariff Code

Search Link: Canada customs tariff 2022

canada hs code

Japan HS Code

Search Link: Japan HS Search

japan hs code

UK Tariff Code

Search Link: Tariff Code Search

UK hs code


How to Ship Directly to walmart WFS

Jiufang e commerce logistics customer review
By Lake
May 19, 2022

Sharing is caring!

What does WFS mean Walmart?

Walmart Fulfillment Services (WFS) is allows sellers to store their inventory at Walmart fulfillment centers. When a customer places an order on Walmart.com, we’ll pick, pack, and ship the item(s) to the customer on your behalf. WFS also handles all customer support and returns for these orders.


How does Walmart fulfillment work?

  1. Set up your account in the WFS portal
  2. Convert your products to Fulfillment by Walmart listings
  3. Send inventory to Walmart fulfillment centers
  4. Customers orders, Walmart picks & delivers
  5. Walmart manages returns and provides customer & seller service


What are the benefits of using Walmart WFS

Walmart fulfillment service (WFS) has the unique ability to provide sellers with the scale, quality, cost, and efficiency to grow a successful business on Walmart.com.

  • Exceptional service. Delight customers with fast delivery, easy returns, and quality customer service.
  • Cost-effective solution. Save on fulfillment with simple pricing and no hidden fees.
  • Full transparency. Track inventory, orders, and shipments with easy-to-read dashboards.
  • Increased site visibility. Gain higher search rankings and Buy Box prominence with Walmart TwoDay delivery tags.
  • Omnichannel success. Optimize your returns with our omnichannel Free & Easy Returns program.
  • Personal support service. Let us be your personal advisor on the next-generation fulfillment service.


How to ship your products to Walmart WFS

First, let’s take a look at what the seller needs to do in the background. 

Background operations:

  • Select WFS products (select products sent to WFS on the “Manage Products” page in the seller’s back office).

  • Convert WFS products (in the seller’s background, item Setup & Maintenance, select Walmart Fulfilled items, follow the steps, a form will be generated in the background, and the seller needs to download and fill in the supplementary information of the product before uploading it to the seller’s background).
  • Ready to ship (24 hours after uploading the form, download the warehousing order form on the Manage items page of the seller’s backstage, fill in and upload).
  • Shipping (Open the Routing Guide, select Generate and Print Label of Manage Shipment on the Send Inventory page, print out the label and paste it on the outer packaging of a single product, print the box label and paste it on the outer box label, and select the logistics provider for delivery)
  • Confirm the shipment (after the logistics provider confirms the delivery of the goods, the inventory can be checked in the background for up to 48 hours).


Additional

Before you can start shipping items to WFS fulfillment centers, you must be in good standing and live in Marketplace.

  1. Walmart WFS official website provide additional information.

  2. You can read Walmart fulfillment centers location in Jiufang Walmart Map Page.

We also have a fantastic video on How To Send Products To Walmart WFS. Check it out!


A container filled with dangerous goods collapsed in Kaohsiung Port

By Lake | May 19, 2022
Jiufang e commerce logistics

A container filled with dangerous goods collapsed in Kaohsiung Port, and hydrochloric acid gas leaked!
According to Taiwanese media reports, at 3 am on May 17, a container containing dangerous goods hydrochloric acid at Pier 79 at Kaohsiung Port was suspected of accidentally collapsing during loading and unloading, causing the leakage of hydrochloric acid gas. The scene was filled with smoke, but fortunately no one was injured.

                                                                                                          —JiuFang E-commerce News